Basics
Intro
Making a Tupper
A tupper is what we call a profile in Tupperbox that you can send messages from.
There are two basic ways of making a new tupper:
- The Dashboard (recommended)
- The tul!register command via the bot on Discord
Whichever one you use, you need two things: A name and some brackets.
- Name: This can be anything - in this example, we'll use the name "Snee", the name of one of my tuppers demonstrated above. The name shows up when you send a message through the tupper.
- Brackets: This is the trigger or command that you use when you want to send a message through your tupper.
For the brackets, many people use the name or initials of the tupper followed by a colon, like snee:text. With brackets like those, you would talk through the tupper by writing a message such as Snee: Hello!. But feel free to use anything you like - as long as it's easy to remember!
You'll always see the word "text" in brackets. The word "text" is a placeholder for what you want the tupper to say - to use any tupper, you write the brackets and replace the word "text" with your message.
Dashboard
To make a tupper via the dashboard, go to the Dashboard and log in with Discord if needed.
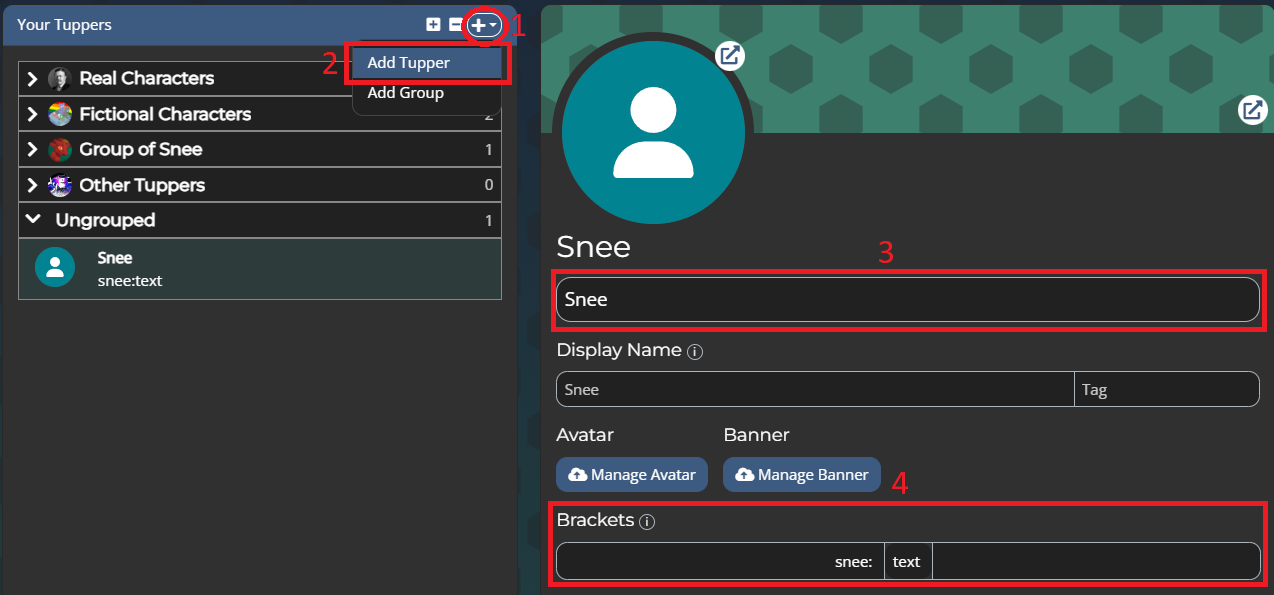
Once you can see your list of tuppers, click the plus in the top right of the list and choose "Add Tupper". Set a name and brackets for your tupper and then click "Save Changes". Take a look at the image below for a visual example.
Discord
To make a tupper via Tupperbox's chat commands on Discord, you'll need to use the tul!register command in an available channel.
The tul!register command, like most Tupperbox commands, can also be used by DMing Tupperbox.
This is a great option if you want to keep your tupper-making private or avoid spamming a channel!
For example, this command will make the same tupper as shown above:
tul!register Snee snee:text
Sending a Tupper Message
Once you have a tupper, you can send a message with it, known as a proxy in Tupperbox slang.
Tupperbox needs to be in the channel you want to send a proxy in. If you haven't already done so, join a server with Tupperbox or Add to Server now.
Proxying is easy:
- Look at your tupper's brackets. They will look something like
guy:textor{text}. - Write the brackets in a message, but replace the word "text" with what you want your tupper to say.
For example, if your brackets are guy: text, you can make your tupper say "Hello!" by sending this message: guy: Hello!. Tupperbox will recognize this as a command to use your tupper and will delete and replace your message.
Not working? Use the tul!diagnose command to see if there are any issues with Tupperbox's setup, or check the troubleshooting page for more steps.
Setting an Avatar
Most people will want a more expressive avatar than the default Discord one. Tupperbox has you covered!
There are three main ways to set an avatar for your tupper:
- The Dashboard (recommended)
- The tul!avatar command via the bot on Discord
- Uploading an image while using the tul!register command to create a tupper
The easiest way is to upload an image on the dashboard. Simply visit the dashboard, select your tupper, and click its avatar or the upload button. You can then upload an image from your computer or provide a direct link to an image. When uploading an image this way, you're also able to choose where the image is cropped to make sure your tupper looks its best.
If you'd rather not use the dashboard, you can also set an avatar using the tul!avatar chat command. For example:
tul!avatar "Snee" <url>
You can either provide an image link, like above, or upload the image as an attachment while running the command instead of giving a link.
Finally, you can also upload an image as an attachment while making a tupper with tul!register. This is the quickest way to set an avatar if you already know what image you want to use!
The avatar you choose will be cropped to a square and compressed to a smaller size to fit Discord's requirements. Make sure to choose an image that looks good when cropped to a square!
Avatars uploaded by Premium users store an additional high-quality copy for convenient access.
Checking your Tuppers
If you ever want to see a list of your tuppers, you can visit the Tupper List dashboard page or use the tul!list command on Discord.
The tul!list command has a few options to help you find the tupper you're looking for, like searching by group or sorting by creation date.
Examples:
tul!list- List all your tupperstul!list group:friends- List all tuppers in the "Friends" grouptul!list sort:created- List tuppers sorted by creation date
You can also pull up details about an individual tupper using the tul!show command. For example, tul!show Snee will show you information about the tupper "Snee".
Premium users can additionally generate shareable profile cards for their tuppers using the tul!profile command.
Removing Tuppers
If you ever want to remove a tupper, you can do so using the Dashboard or the tul!remove command.
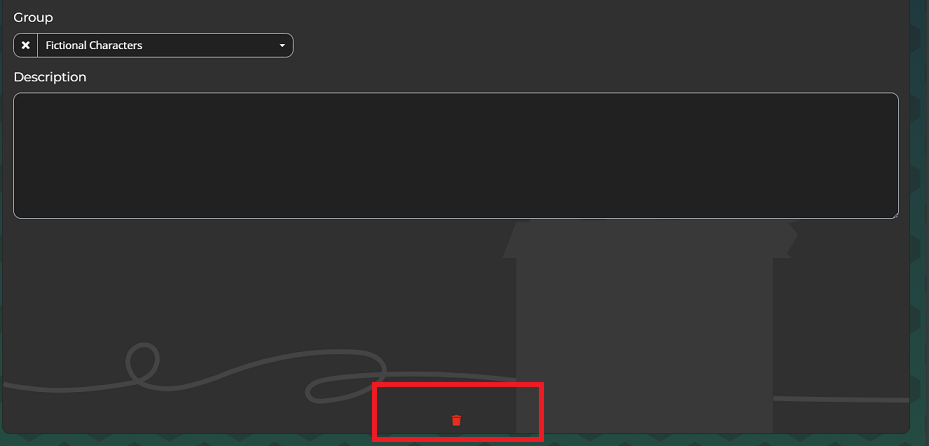
For example, to remove the tupper "Snee" using the dashboard, click the trash can icon at the bottom of the screen.
To remove the same tupper using the remove command, you would type tul!remove Snee.
Removing a tupper is permanent and cannot be undone! If you might want it back later, you could consider using tul!export to take a backup of your data.
There are a few other ways to bulk remove tuppers, such as the tul!remove *, tul!purge, and tul!prune commands. Check the commands page for more information.
Next Steps
Now that you know how to make a tupper and send a message with it, you're ready to explore more of Tupperbox's features!
- If you're looking for more commands to use, check out the commands page for a full list of what Tupperbox can do.
- Check out the Dashboard to see all your tuppers in one place and manage them with a simple visual drag-n-drop interface.
- If you're having trouble, the troubleshooting page is a great place to start.
- Check out the FAQ for answers to common questions about Tupperbox.